Gazing at the night sky never gets old, and having the right telescope makes the experience so much better, especially if you’re just getting into stargazing. The Sky Watcher 130mm Newtonian telescope is often recommended for beginners thanks to its mix of power, portability, and features that make observing the cosmos both fun and rewarding. I’m going to break down what makes this telescope worth a look, what you can expect as you set up, and some tips for getting the most out of your star parties at home.
What You Get with the Sky Watcher 130mm Newtonian Telescope
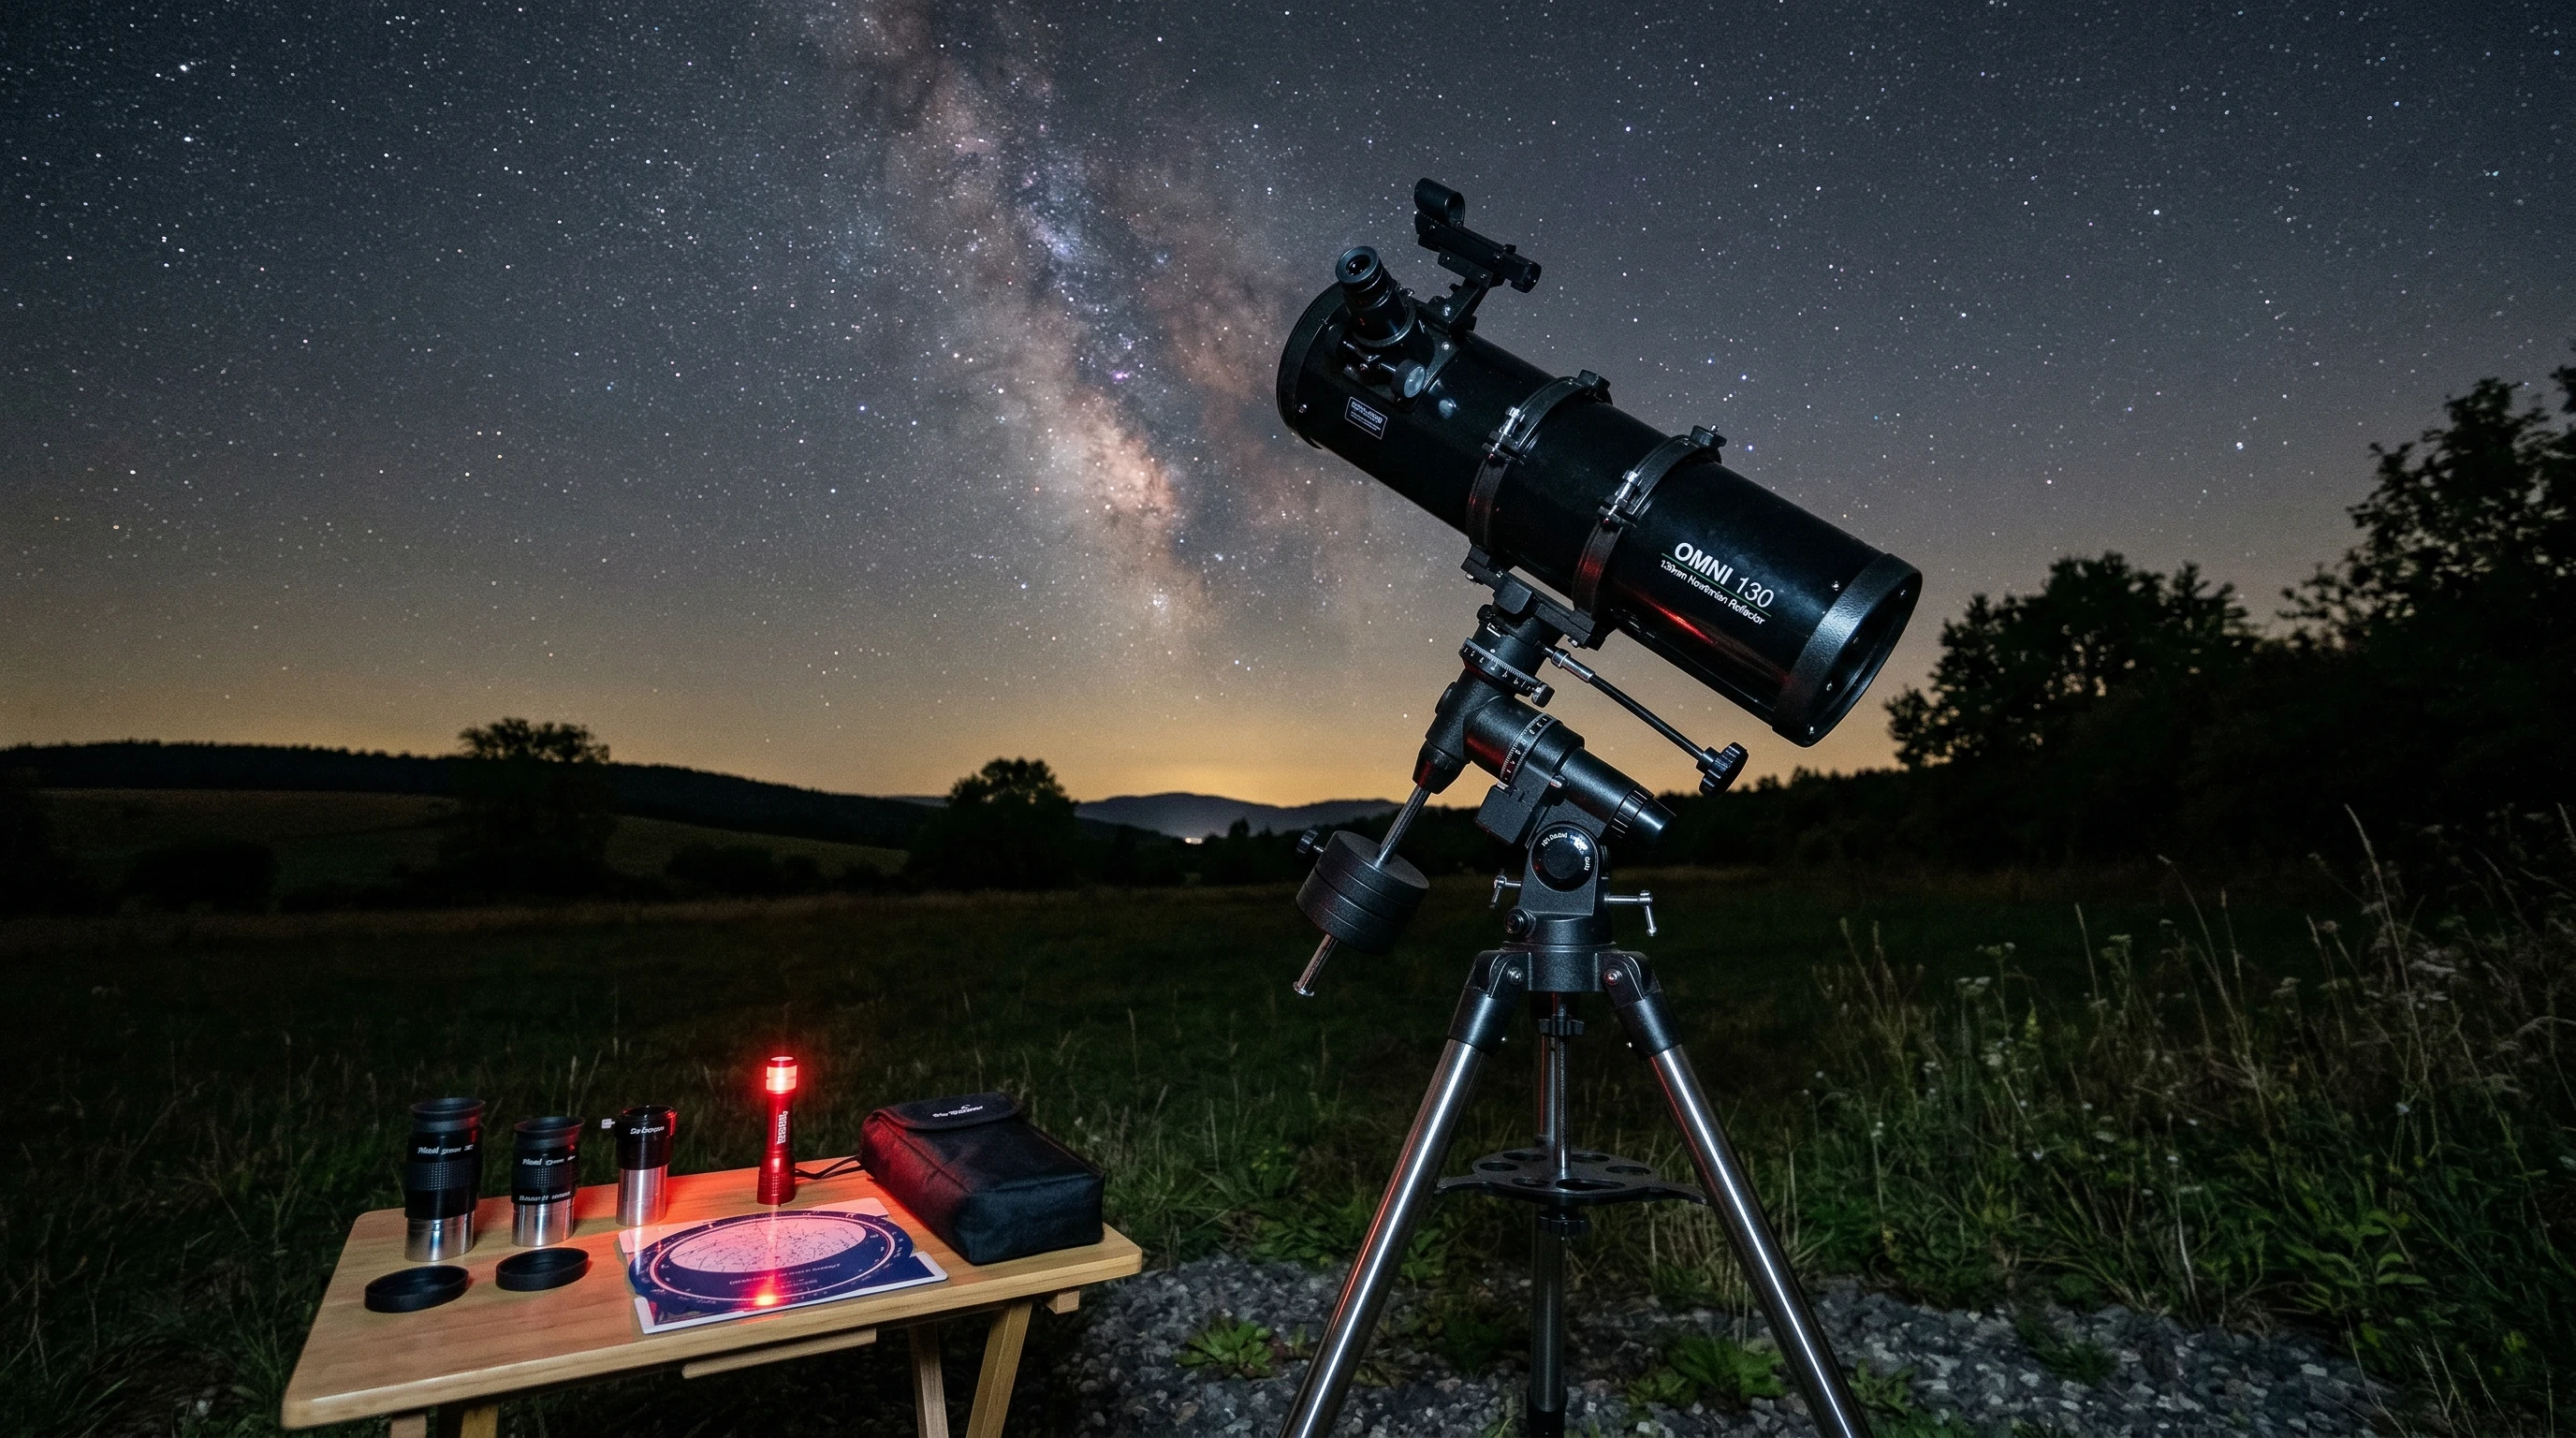
This telescope brings together a 130mm (about 5.1 inches) reflector mirror with a 900mm focal length. That combination means you get a nice broad view and plenty of light gathering power, just what’s needed for seeing details on the moon, planets, and even some of those bright deep sky objects like star clusters and galaxies.
Included with the telescope are three eyepieces: a 25mm, a 12.5mm, and a Barlow lens. This set gives plenty of options when it comes to changing magnification and tweaking your view. The telescope sits on a sturdy metal tripod, and the mount is the equatorial type. That style takes a little getting used to, but it’s really helpful for tracking objects as the Earth rotates. There’s also an option to add a Right Ascension Drive; letting the telescope automatically keep things in the eyepiece once you’re lined up.
Understanding the Basics: Why the 130mm Newtonian?
The size of the mirror (130mm) is pretty handy for new astronomers. Anything smaller tends to cut down on detail, especially when you want to see Saturn’s rings or the tiny craters on the Moon. The 900mm focal length pairs well with that mirror size, balancing getting a close look and still being able to zoom out for wider field views. It’s a combo that’s friendly for both planetary watching and taking in bigger objects like nebulae.
For those new to telescopes, a Newtonian design means the telescope uses mirrors instead of glass lenses up front. This keeps things lighter and usually more affordable, for the amount of light you get. It does mean you’ll check the alignment (collimation) from time to time, but it’s not as daunting as it might sound. Modern guides and tutorials have made this basic maintenance step simpler than ever before.
Unpacking the Included Accessories
- Eyepieces (25mm and 12.5mm): Swapping between these lenses changes how much you zoom in. The 25mm is good for scanning star fields and wide lunar views, while the 12.5mm pushes the magnification for looking at planets and smaller craters.
- Barlow lens: This doubler pops between the telescope and an eyepiece to increase magnification, so you’ve basically got six different viewing combos before even thinking about buying extra lenses.
- Equatorial Mount: Unlike simple updown/leftright tripods, the equatorial mount lets you track things as they move across the sky, which is super useful for longer sessions or sharing the view with others.
- Right Ascension Drive (Optional): If you find yourself spending more time observing, this addon is worth checking out. You won’t have to nudge the scope constantly to follow planets or the moon; it saves time and a lot of hassle, especially during group sessions.
- Sturdy Metal Tripod: A solid tripod is really important for keeping the view steady, and the included tripod does a solid job. Wobbly images get frustrating fast, so a metal tripod is a win for anyone who fusses about vibrations and setup stability.
Quick Start Guide: Setting Up for Your First Night
- Find a stable, level spot away from streetlights: This really helps reduce glare and gives the best contrast for those fainter objects.
- Set up the tripod and mount: Extend the tripod legs to a height that’s comfortable. Attach the equatorial mount before putting on the telescope tube.
- Attach the optical tube and balance: After securing, shift the tube until it feels evenly balanced. This makes tracking a lot easier.
- Align the finder scope: During the day, aim at a distant object (like a phone pole or tree) with the telescope and match up the finder scope so they’re both pointed in exactly the same spot.
- Eyepiece selection: Start with the 25mm eyepiece for a wide field, which makes it easier to locate the moon or bright stars; once you center an object, switch to the 12.5mm or try the Barlow for a closer look.
- Polar alignment: For better tracking, line up the equatorial mount with Polaris (the North Star). This isn’t too tricky, just an extra step if you plan to observe for longer stretches.
Give yourself a bit of time the first evening since learning how all the knobs and tweaks work gets much easier with practice. Don’t be discouraged if setup or aiming feels slow at first—fluidity comes with repetition.
Stuff That Beginners Should Keep in Mind
- Learning Curve with Equatorial Mounts: If you’re used to simple upanddown motion, equatorial mounts feel a bit weird at first. After a few sessions, though, adjusting becomes second nature and makes tracking planets way more efficient. You’ll soon find yourself explaining it to others at your next star gathering.
- Collimation: Newtonians need their mirrors to stay aligned. You only need to check every so often, and there are handy tutorials online that break the process down step by step for newcomers.
- Magnification Limits: It’s tempting to use the highest power right away, but conditions like air turbulence (seeing) affect how much detail you can actually get. Start lower, then bump up when the view is sharp. Patience will help you make the most of those highpower moments.
- Stability and Portability: The metal tripod is sturdy, but if you’re carrying the whole setup to a field or park, do a practice run at home to make moving it easier. Consider a padded case for longer treks; a little prep saves a lot of trouble.
- Upgrades: You can always get extra eyepieces or planetary filters down the line, but the kit included covers most early needs, making it easy to enjoy the hobby without extra purchases upfront.
Tips for Using the Sky Watcher 130mm Like a Pro
Once you’re comfortable with the basics, there are a few ways to get even more out of observing nights:
- Let the telescope cool to outdoor temperature before using for sharpest views. Set it up half an hour before you plan to start looking. Cooler mirrors show details more crisply.
- Bring a red flashlight: Regular flashlights ruin night vision, but red light keeps your eyes adjusted to the dark and you’ll spot more stars.
- Keep a star chart or astronomy app handy: These help you track down interesting objects each night. Apps are especially helpful for beginners who want quick, up-to-date guidance.
- Log your observations: Jotting down notes on what you spot can be surprisingly fun, and it helps you see your progress. Over time, your notes will record a real adventure through the sky.
- Try lunar and planetary viewing first, then get into deepsky objects: The moon and planets are bright, so they’re way easier to find and look great in a 130mm scope. Once confident, start chasing clusters, nebulae, and galaxies for a fresh challenge.
- Share the view: Astronomy is a hit at gatherings. Show off Saturn’s rings or craggy lunar details—these crowdpleasers make an instant impression on friends and family.
What Can You See With a 130mm Newtonian?
I’ve found that this size scope is great for a lot of the typical beginner “wow” targets:
- Crater details on the Moon
- Saturn’s rings and Jupiter’s cloud bands and moons
- Venus phases
- Binary stars and colorful double stars
- Bright star clusters like the Pleiades or Beehive cluster
- Orion Nebula, Andromeda Galaxy (as faint fuzzy patches under dark skies)
Some deepsky targets need darker rural skies, but planets and the moon look incredible even from the suburbs, and the views remain eye-catching regardless of light pollution. If you get the chance to visit a darksky site, new wonders become available—each visit brings something different to stumble upon as your skills grow. With a bit of patience and curiosity, the 130mm is your ticket to an amazing adventure above.
Frequently Asked Questions
Is this telescope beginnerfriendly?
Yes, as long as you don’t mind a bit of setup and learning how the equatorial mount works. The included eyepieces and stable mount actually make it easier to stick with the hobby. The biggest hurdle is initial assembly, but it soon becomes second nature and opens up a new world of discovery each night.
What’s the Right Ascension Drive for?
It’s a small motor that automatically moves the telescope to keep the target in view as the sky shifts. You won’t need to adjust by hand, so it’s perfect for group viewing or longer looks at planets and the moon. If you enjoy sharing the scope, this add-on is a real time saver and saves everyone the frustration of a drifting view.
How much can you see in city or suburban skies?
Planets and the moon will always look great, but light pollution makes faint galaxies tough. Traveling to darker spots gives the best results for those deepsky wonders. Even so, many double stars, the moon, and the largest star clusters still show up impressively from your backyard.
Do I need to buy anything else to get started?
The included accessories are just fine out of the box. An astronomy app and a red flashlight are nice extras, but the basics are all here for your first sessions. You can step up your game later with planetary filters or extra eyepieces, but you’ll be set for a strong start right away.
Why the Sky Watcher 130mm Newtonian is Worth Checking Out
For anyone serious about getting into astronomy, this telescope lands in a sweet spot. It’s big enough for awesome lunar and planetary views, the setup is pretty straightforward once you have a couple of sessions under your belt, and the build quality holds up to tons of use. The bundled eyepieces don’t leave you wishing for immediate upgrades, and that optional drive opens up even longer, more relaxed viewing sessions without fuss. It’s really about getting started with something that will let you explore and learn without outgrowing it after just a couple of months. With this telescope, you can look forward to many nights of eye-catching sights, steady views, and a learning curve that steadily rewards your curiosity and enthusiasm. Stargazing becomes a lasting adventure, and the 130mm Newtonian is a great companion on that ride.
The Sky-Watcher 130mm Reflector telescope can be purchased here.